Tips and Tricks For Repairing and Upgrading Your Home
Replacing the Clutch On Your Washing Machine
If your washing machine is older (or OLD, like mine), it's possible that it has stopped spinning and agitating the way it's supposed to. If that's happening to you, you might need a new washer clutch. Below, we'll discuss the process of replacing your washer clutch so you can continue to get use from your washing machine, because we all need to get as much life as possible from our major appliances.
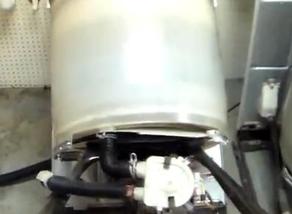
Before we even get started, be sure you've unplugged the appliance, and turn off the hot and cold water supply valves. You will also need to disconnect the two water supply hoses attached to the rear panel along with the drain hose. Be prepared for some water to spill out.
Next you will need to remove the agitator. If your model has a rinse dispenser, pull the lock ring up with your fingers and twist the dispenser upwards to remove.
Next, remove the agitator cap. Depending on your model you may also need to remove a dust cap. Hold the agitator base and use a seven sixteenth inch socket to remove the bolt and washer and pull the agitator upwards to remove it. Now carefully tilt the appliance back so its rear panel rests on a towel or carpet.
Next, unsnap the pump clips and wiggle the pump off of the motor shaft. Disconnect the motor wire harness and un-clip the wires from the plastic retainer. Use a half-inch socket to remove the bolts attaching the gear case to the base. Now carefully pull the motor and gear case assembly out. Remove the thrust washer from the gear case shaft.
Next, use needle nose pliers to remove the old clutch's support ring and a flat head screwdriver to remove the retainer ring. Now slide the old clutch off of the gear case shaft. Detach the old break cam by removing the c clip.
You're now ready to install the new clutch assembly.
Insert the isolator ring into the clutch housing. Please note that if you have a compact washer you will need to substitute the shorter spring for the one in the clutch band.
Place the new brake cam onto the drive tube and secure with the c clip. Slide the new clutch onto the gear case shaft and secure the new clutch with the supplied retainer ring and the original support ring. Replace the thrust washer.
Now slide the motor and gear case assembly into position making sure the clutch spring is opposite the break cam. Be aware this may require some adjustment before the gear case sits flush against the base.
Secure with the bolts. Secure and reconnect the wire harness.
Next align the motor shaft with the pump and slide the pump on. Reinstall both pump clips. Now carefully lift the appliance to its upright position.
Place the agitator back onto the drive shaft and reinstall the bolt and washer. Replace the dust cap. If your model has one, replace the agitator cap. If your model has a rinse dispenser, push it down until it snaps into place and press the lock ring down with your thumbs.
Reattach the water hoses and turn the hot and cold water valves back on and plug the appliance back in to make sure it's functioning properly.
Repairing Holes in Drywall
Fixing holes in drywall is something that you really should know how to do if you're planning any kind of work around your home. The reason being, at some point your drywall is probably going to get damaged. It's not hard to fix if you know what you're doing, so... that's what we're here for.
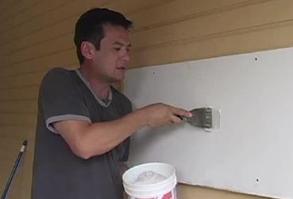
If you have damaged dry wall and the hole is not too large, it’s very easy to fix for yourself.
What you want to do is get some fiberglass mesh tape, which is specifically made for wall board joints, and just cut off a section of it, maybe a couple inches, three inches longer than the span of the hole there. If you get the kind of fiberglass tape that self-adheres, it’s even better and you don’t have to put a coat of joint compound down first, which you would have to do if you got the kind that did not have an adhesive back to it. And I’ll show you what I’m talking about in a moment.
And I would say square it up and make it look as good as you can. And the next thing you want to do is get some joint compound which some people call mud, nd take a little bit of it on a spatula or a putty knife and just skim a smooth coat over that.
Now, it’s going to bubble up on you land look funny on the first coat, but you want to let it dry and then once you do let it dry, you can sand that down a little bit. And what you’ll do is come back and add at least one more coat a little further out. Again, this is after it’s already dried.
You’re going to skim some on a little bit wider, sort of feathering out the edges which will hide the small bump being made by the repair. And then once again, sand it, prime it, and paint it. And that's all there is to it.
Coming Soon!...
Coming soon... loads of helpful advice on sorting out all sorts of home repairs, rehabs and renovations. With years of experience, it won't take me long to help you fix what needs fixing, but... it might take me a little longer to figure out how to get this website working right! Just hang tight. :)
